Southend on Sea Wargames Group Page
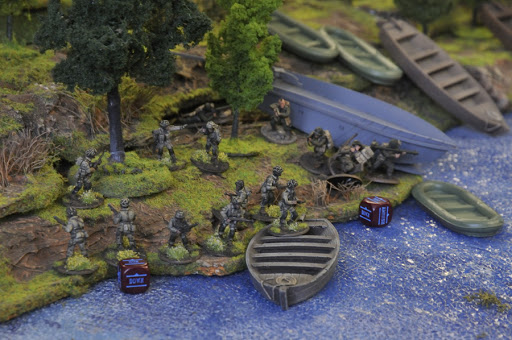
River crossings, if ever there was an obstacle that vexes wargamers to no end, it’s a river. Rivers have the worst aspects of many obstacles coupled with the fact that it forces the enemy into extremely limited crossing sites, which the defender can cover with fire easily, or deny the attacker any crossing site with some quite simple steps. One of the more popular is, of course, blowing bridges.
Bridges have been the sites of battles since old Horatius made his stand against the Etruscans. They’re easy to defend and even easier to deny, especially once explosives enter the picture. And until smoke and cannon enter the picture, river crossings were a thing best done when the enemy wasn’t in front of it. In such cases, it was usually thought best to send scouts to find another place to cross to flank one’s enemy.
So, what are the best ways to cross a river as a wargamer? I’ve run river crossing games, defended rivers, and crossed rivers. So, I do bring some knowledge to this topic. Here are Jason’s rules for river crossing:
- Don’t cross in the face of the enemy. Cross away from his main strength – This goes without saying. Sure, there’s a historical example in World War II of bridges being taken at the run under fire (Nijmegen and Remagen), but those were cases of sheer luck. In both cases, the explosives on the bridge failed to function, and the Allied troops caught a break. Best way to take a bridge? Take it from both ends. That gets into point number 2.
- Envelop a crossing site – That means send an advanced force that can move fast across the river first and have it proceed overland to take the opposite end of the bridge or crossing site first. Make sure you have it covered by friendly fire from the opposite bank, and an element of surprise helps. Diversions are key. One of my favorite methods for this is, well, making a fake crossing attempt or two to pin down the enemy defenders.
- Bring an alternative means to cross if your first option fails – This is as much on the GM as you. But make sure you have some engineers to lay or build a footbridge at the very least if the main bridge goes poof or ferry you across in some boats. Again, any such movements should be done under cover of friendly supporting fire.
- Move fast – Have a plan and run with it. But make sure that plan is flexible enough to cover if something goes wrong…and it will go wrong. I cannot name an opposed river crossing where something DIDN’T go wrong. Violence of action is a must in these situations, and moving quickly is the difference between getting your river crossing and not getting said the same.
- Fire support and lots of it – Make sure you bring plenty of artillery to keep the enemy’s heads down and pinned by fire. He won’t be able to move if he risks having his units torn to pieces by concentrated artillery fire. Also, in later periods, such as WWII onwards, having a couple of mortars firing smoke is handy.
So now, let’s talk about an actual river crossing, and see how the lessons are applied, and see how things can still go wrong.
Nijmegen Bridge, 20th September 1944

Map of the Waal Crossing | “Letters from Uncle Dave”
Operation Market-Garden, Field Marshal Montgomery’s bid to force the lower Rhine and cross into the industrial heartland of Germany was held up by the fact that British XXX Corps was behind schedule trying to push up one two-lane road in terrain that wasn’t really suited for the purpose. First, the US 101st Airborne had failed to take the bridge at Son, near Eindhoven, and that delayed the British for hours till they managed to get a Bailey bridge over the river and get XXX Corps moving again.
The US 82nd Airborne was likewise under heavy pressure at Nijmegen and hadn’t taken their bridge either, as they were holding their landing zones by their fingernails under heavy German pressure. By the time XXX Corps arrived in Nijmegen, the operation was at least a day behind schedule. And to the north lay the major prize: Arnhem, where the British 1st Airborne was holding on to its own landing zones while one isolated battalion held one end of Arnhem Bridge.
Time was of the essence, and the commander of the 82nd Airborne came up with a bold if seemingly suicidal plan. A battalion of the 82nd would move 1 mile to the west of Nijmegen bridge, cross the Waal by boat and take the opposite side of the bridge from the flank. The plan had a lot going against it. The crossing would take place in broad daylight, and when the British supplied assault boats arrived? One paratrooper described them as “pieces of plywood with canvas wrapped around them and a few extra boards piled on top.” Worse, there were only three paddles per boat, and the Waal had a strong current.
All of this fell on the shoulders of the 3rd Battalion, 504th Parachute Infantry, and its redoubtable commander, Major Julian Cook.

Major Julian Cook, 3-504th Commanding | Wikipedia
The assault itself jumped off late, and the British didn’t deliver the promised number of boats. XXX Corps tried their best to “shoot in” the assault, laying down what seemed to a withering curtain of smoke and machine gun fire, but once their fire lifted, the Germans laid down a curtain of their own fire, and the paratroopers could do little but frantically paddle for the far shore, in some cases, using their rifle butts, and pray. Major Cook was timing his paddling to “Hail Mary, Full of Grace.” Lt. Colonel Joe Vandeleur of the 2nd Battalion, Irish Guards, British Guards Armored Division made this observation about the crossing:
It was a horrible, horrible sight. Boats were literally blown out of the water. Huge geysers shot up as shells hit and small arms fire from the northern bank made the river look like a seething cauldron … I saw one or two boats hit the beaches, followed by three or four others. The men got out and began moving across an open field. My God! What a courageous sight it was! They just moved across that field steadily, I never saw a single man lie down until he was hit. I didn’t think more than half the fleet made it across. The boats started back, and it was obvious half of them had been lost. (Taken from the Weapons and Warfare Blog).

A painting of the Waal Crossing | Weapons and Warfare
By some not so minor miracle, enough men of the 3-504th managed to survive the river crossing and with little more than determination, not a little bit of anger, as well as bayonets and hand grenades, took the German positions on the far bank at a run, and then turned east to overrun the far bank of the bridge as planned. The boats soon turned back to bring the rest of the 504th across as the XXX Corps launched a direct assault on the south side of the bridge and took the bridge at the run.
In a fluke of good fortune for XXX Corps, German attempts to blow the bridge were unsuccessful, as the charges failed to detonate for reasons still unknown to this day. What happened afterward was a source of some controversy. The British, instead of driving pell-mell for Arnhem to relieve the British 1st Airborne there, paused, stating they needed to wait for their infantry to come up and clear the rest of Nijmegen. To be fair, this wasn’t an idle concern, but amongst 82nd Airborne veterans, there was a feeling the British had “stopped for tea.” Several American battalion commanders offered up their units as infantry if it got the British moving down the road to Arnhem, but Gavin and XXX Corps both vetoed those efforts.
History will reflect Market-Garden overall as a failure, but the Nijmagen river crossing is an example of a successful river crossing. It succeeded because it obeyed the basic rules of a successful crossing, even with all that went wrong, and it had not a little bit of luck behind it.
–
At Epoch Xperience, we specialize in creating compelling narratives and provide research to give your game the kind of details that engage your players and create a resonant world they want to spend time in. If you are interested in learning more about our gaming research services, you can browse Epoch Xperience’s service on our parent site, SJR Research.
–
(This article is credited to Jason Weiser. Jason is a long-time wargamer with published works in the Journal of the Society of Twentieth Century Wargamers; Miniature Wargames Magazine; and Wargames, Strategy, and Soldier.)